 Knowledge
admin
Author at The Sharing KH
Related Articles
Knowledge
 News
News
 News
News

Step 1: Add Zabbix repo
bash
wget https://repo.zabbix.com/zabbix/7.2/release/ubuntu/pool/main/z/zabbix-release/zabbix-release_latest_7.2+ubuntu24.04_all.deb
dpkg -i zabbix-release_latest_7.2+ubuntu24.04_all.deb
apt update
Adjust the URL for your Ubuntu version (22.04 / 24.04). Check repo.zabbix.com for the latest.
Step 2: Install server, frontend, agent
bash
apt install -y zabbix-server-mysql zabbix-frontend-php \
  zabbix-nginx-conf zabbix-sql-scripts zabbix-agent2
Step 3: Setup MySQL database
sql
mysql -uroot -p
CREATE DATABASE zabbix CHARACTER SET utf8mb4 COLLATE utf8mb4_bin;
CREATE USER 'zabbix'@'localhost' IDENTIFIED BY 'StrongPass123!';
GRANT ALL PRIVILEGES ON zabbix.* TO 'zabbix'@'localhost';
FLUSH PRIVILEGES;
EXIT;
bash
# Import schema
zcat /usr/share/zabbix/sql-scripts/mysql/server.sql.gz | \
  mysql --default-character-set=utf8mb4 -uzabbix -p zabbix
Step 4: Configure Zabbix server
bash
nano /etc/zabbix/zabbix_server.confSet these values:
ini
DBHost=localhost
DBName=zabbix
DBUser=zabbix
DBPassword=StrongPass123!
Step 5: Configure Nginx
bash
nano /etc/zabbix/nginx.confnginx
listen 80;
server_name your-server-ip-or-domain;
Step 6: Start & enable services
bash
systemctl restart zabbix-server zabbix-agent2 nginx php8.3-fpm
systemctl enable zabbix-server zabbix-agent2 nginx php8.3-fpm
Step 7: Open firewall ports
bash
ufw allow 10050/tcp   # agent passive
ufw allow 10051/tcp   # server
ufw allow 80/tcp      # web UI
Web setup wizard: go to http://<server-ip> and complete the setup (DB credentials, timezone). Default login: Admin / zabbix.
bash
# Add repo (same as server)
wget https://repo.zabbix.com/zabbix/7.2/release/ubuntu/pool/main/z/zabbix-release/zabbix-release_latest_7.2+ubuntu24.04_all.deb
dpkg -i zabbix-release_latest_7.2+ubuntu24.04_all.deb
apt update
apt install -y zabbix-agent2

# Configure
nano /etc/zabbix/zabbix_agent2.conf
Set these:
ini
Server=<zabbix-server-ip>          # passive: server polls agent
ServerActive=<zabbix-server-ip>    # active: agent pushes to server
Hostname=client-hostname           # must match what you set in Zabbix UI
bash
systemctl restart zabbix-agent2
systemctl enable zabbix-agent2
ufw allow 10050/tcp.msi installer from zabbix.com/downloadZabbix Agent 2 starts automatically.bash
rpm -Uvh https://repo.zabbix.com/zabbix/7.2/release/el/9/x86_64/zabbix-release-latest-7.2.el9.noarch.rpm
dnf install -y zabbix-agent2
# same config as Linux above
systemctl enable --now zabbix-agent2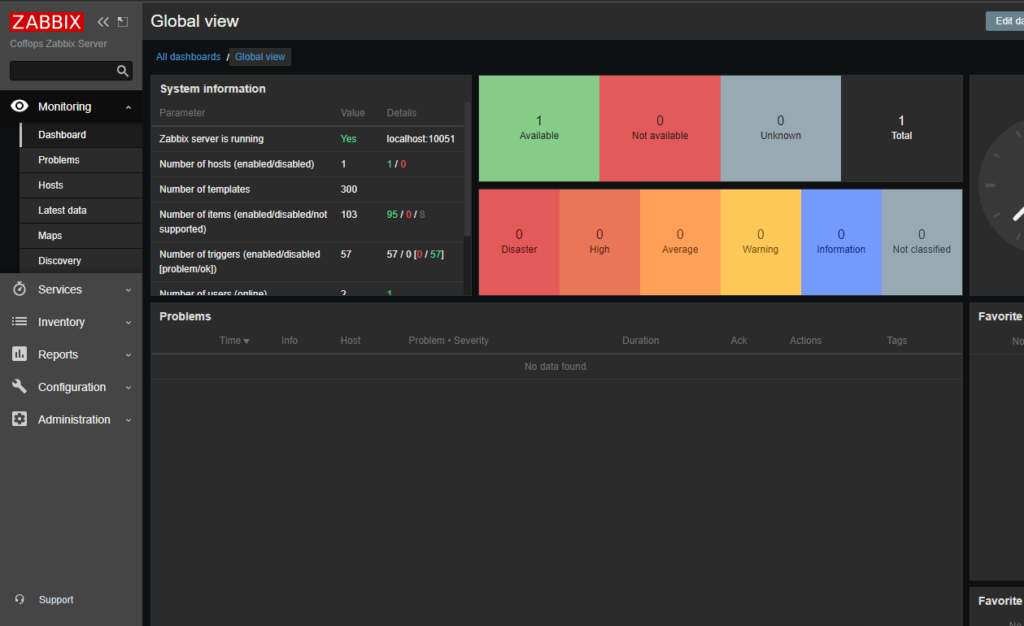
firewall-cmd --permanent --add-port=10050/tcp && firewall-cmd --reloadHostname in agent config10050Linux by Zabbix agent (or Windows equivalent)Within a minute the host status turns green (ZBX icon) if the agent is reachable.
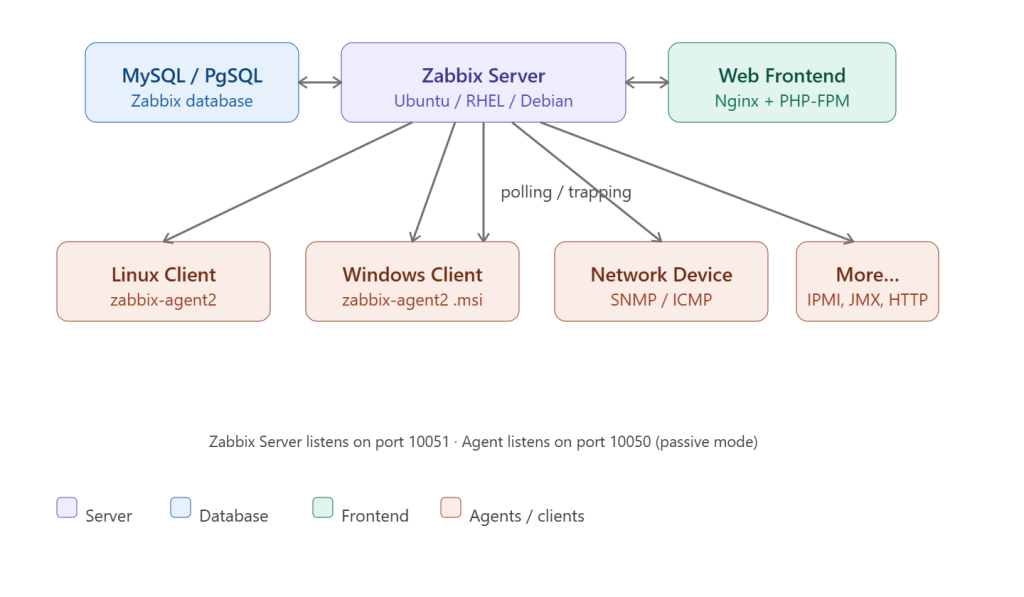
| Component | Port | Direction |
|---|---|---|
| Zabbix Server | 10051 | receives from active agents |
| Zabbix Agent (passive) | 10050 | server polls agent |
| Web UI | 80/443 | browser → nginx |
Passive mode = server initiates, pulls data from agent (default).
Active mode = agent initiates, pushes data to server (better for NAT/firewall scenarios).
admin
Author at The Sharing KH
Knowledge
News
News